Moodle will technically let you drag a video onto a course page. Then the file stops uploading somewhere past a few hundred megabytes, your nightly backup doubles in size, and there is no way to tell whether a student watched the thing or just opened it. The Moodle docs answer "how do I embed a video"; they do not answer "how do I add video that survives a real course."
TL;DR
- Three ways to add video to Moodle: upload the file into Moodle, embed an external link (YouTube), or use a video plugin. Each fits a different need.
- File upload suits one short clip; it caps on size, bloats backups, and has no analytics.
- YouTube embed is free but moves private content to a public platform with no completion tracking.
- A video plugin is the right answer for course video: adaptive playback, captions, completion, and DRM. This guide walks the FastPix plugin add flow end to end.
- Quick path: in a course with Edit mode on, add a FastPix Video activity, upload or paste a URL, set media and playback options, save.
The three ways to add video to Moodle, and where each breaks
1. Upload the file straight into Moodle. You drag an MP4 onto the course page or add it through the file picker, and Moodle stores and serves it. This works for a single short clip. It falls apart at scale: Moodle's upload limit stops large lecture recordings, every stored video inflates your backups, and there is no adaptive streaming, so a student on a phone gets the same heavy file as someone on campus fibre. There are no analytics either, so "did they watch it" is unanswerable. This is the source of the most common complaint in this space, "why is my video not uploading to Moodle," and the answer is almost always a file-size or server limit.
2. Embed an external link. Paste a YouTube or Vimeo URL and Moodle renders the player. It is free and takes ten seconds. The trade-offs are real: your course video now lives on a public platform outside the course's private boundary, you inherit that platform's recommendations and ads, and you get no completion tracking tied to the learner. Fine for a supplementary clip, wrong for graded or confidential content.
3. Use a video plugin. A plugin connects Moodle to a video platform that handles upload, encoding, delivery, and playback, and reports watch data back into Moodle. This is the right answer when video is part of the actual coursework. The FastPix plugin takes the managed route: the video lives on FastPix infrastructure, plays adaptively, and arrives with captions, completion, and optional DRM.
The first two are built into Moodle and cost nothing to try. Reach for a plugin when the video is the lesson, not a footnote to it.
How to add a video with the FastPix plugin
This walkthrough assumes the plugin is installed and connected. If it is not yet, the Moodle video plugin guide covers the one-time install and setup. Once it is in, adding a video is a teacher workflow that takes a couple of minutes.
In your course, turn on Edit mode, then in a section select the plus icon and choose Activity or resource.

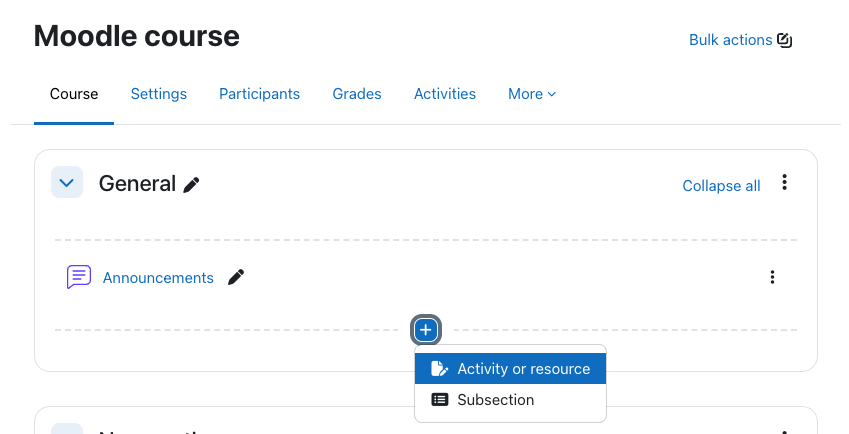
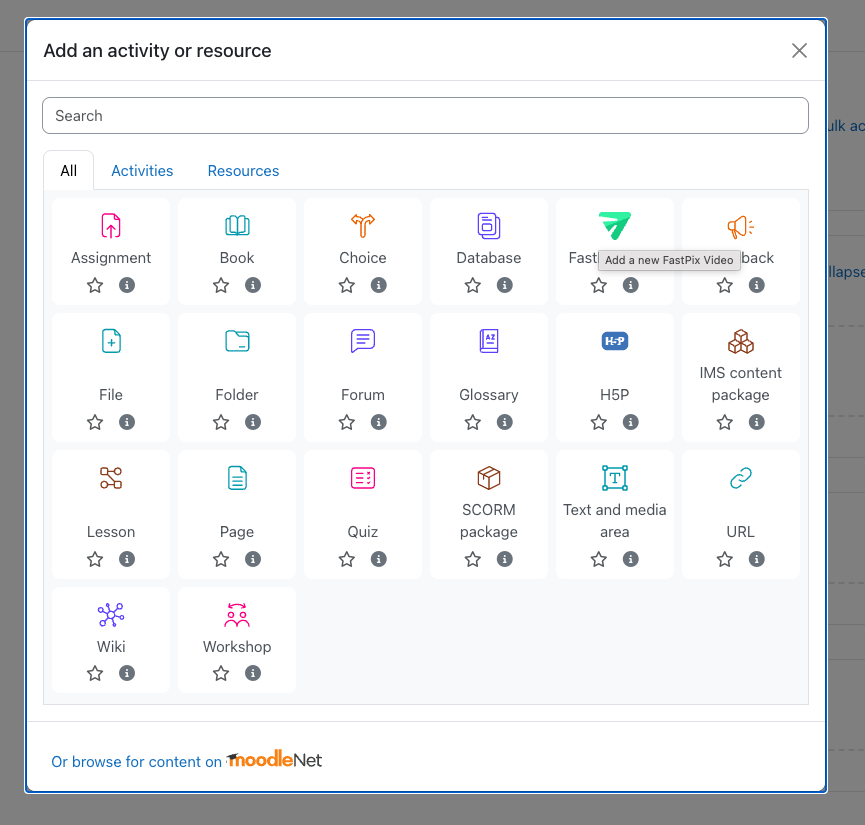
In the Add an activity or resource dialog, choose FastPix Video.
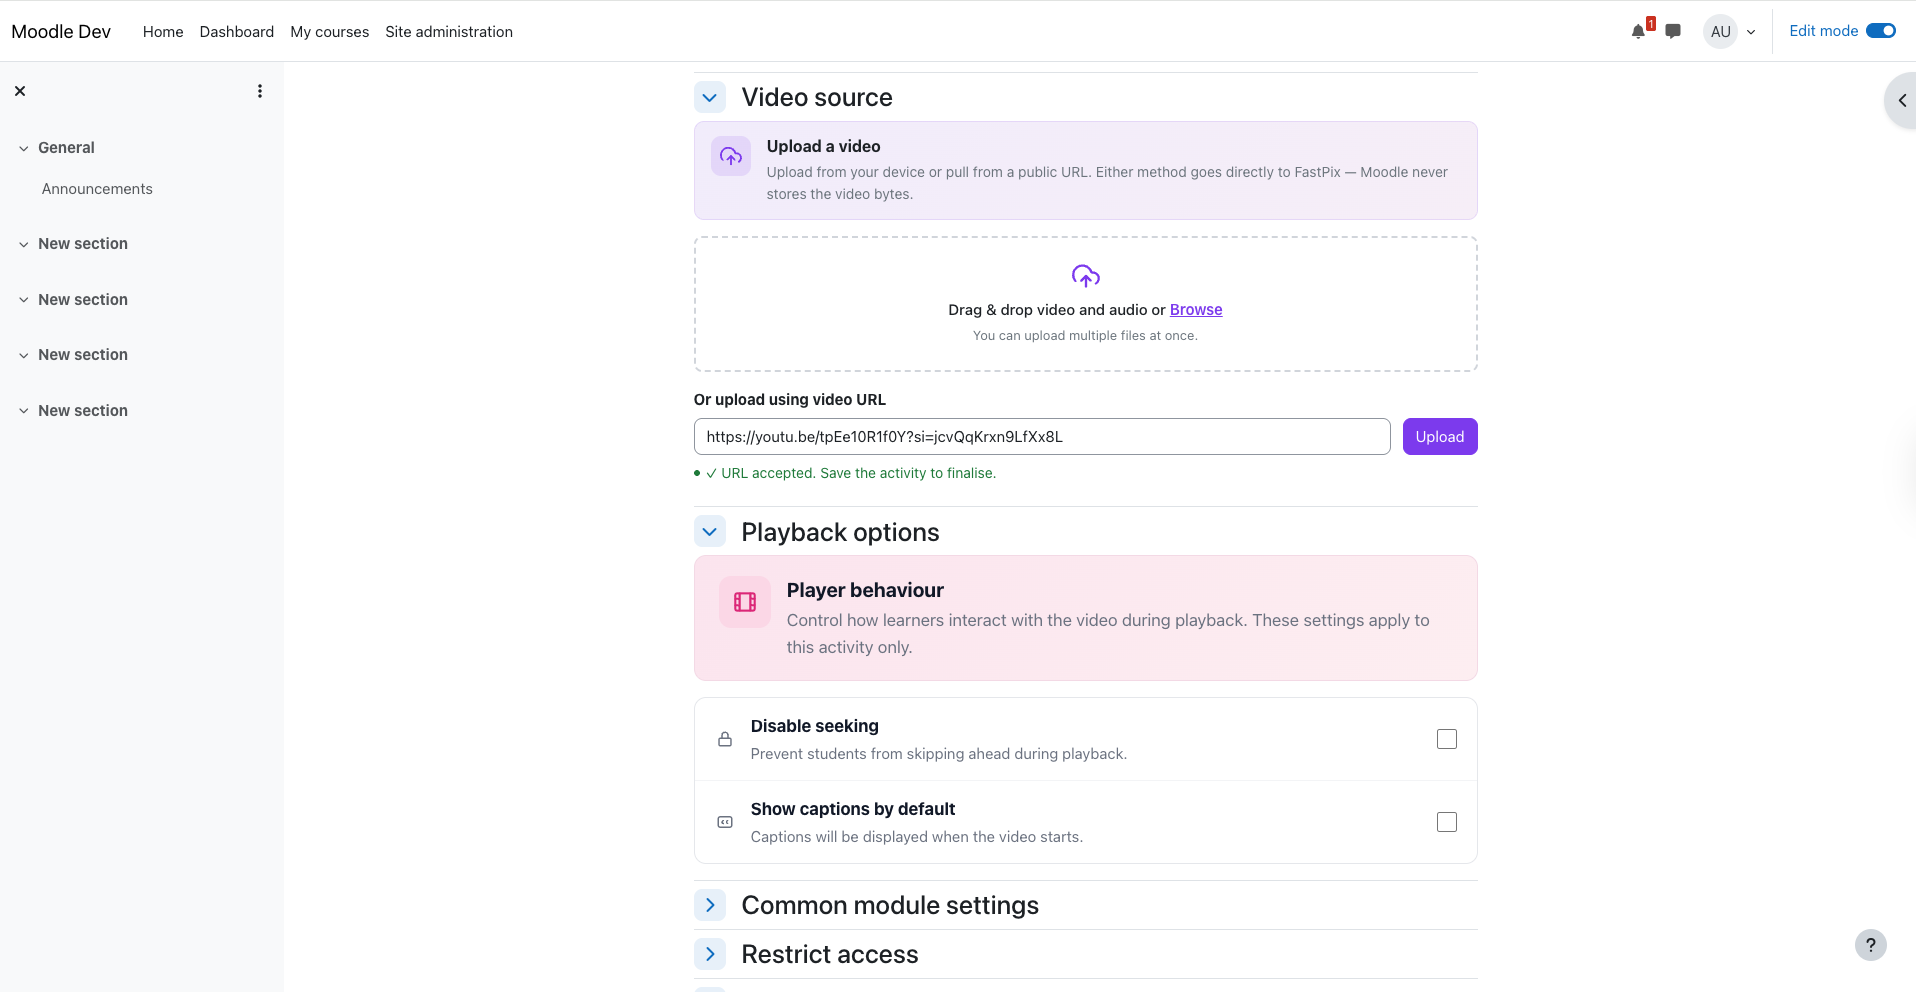
Give the activity a name. In Media settings, set the access policy: Private (signed playback, the recommended default), Public, or DRM for paid or confidential content. Turn on caption auto-generation here if you want captions on this video; for the full picture see auto-captioning Moodle course videos.

In Video source, upload a file or paste a video URL. The upload goes directly to FastPix in resumable chunks, so a large lecture survives a flaky connection and never touches Moodle's storage. Under Playback options, set behaviour like disable seeking (so students cannot skip ahead) or show captions by default.
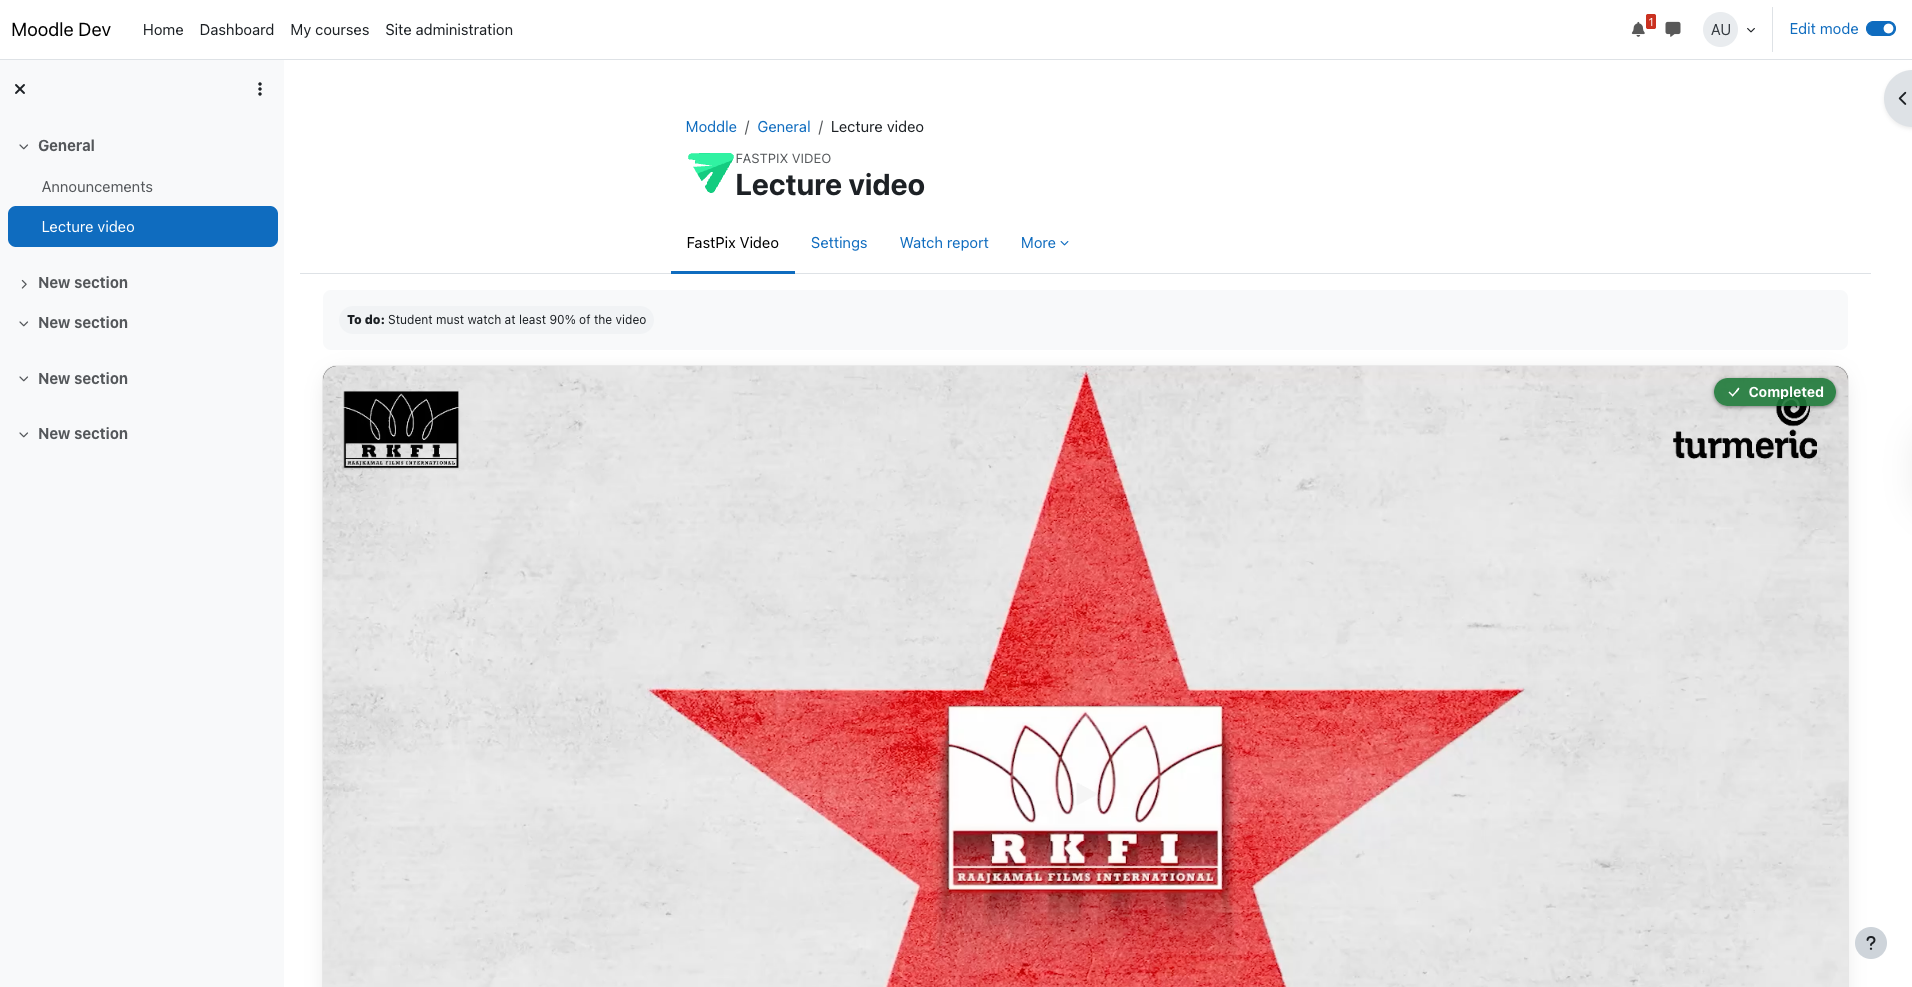
Save the activity. Once FastPix finishes processing, the video plays in the course as an adaptive stream, with captions and a chapter list if you enabled them.
What you get beyond Moodle's built-in video
The difference is not a nicer player. It is the things file upload and YouTube embeds cannot do.
Large uploads that do not bloat Moodle. Video lives on FastPix, not in your backups, and the resumable upload bypasses Moodle's file-size wall.
Adaptive streaming. The video adjusts to each viewer's network, so it plays cleanly on mobile data and campus fibre alike.
Completion you can trust. The activity tracks coverage, the unique seconds a student actually watched, so skipping to the end does not complete it. See how to track video completion in Moodle.
Captions and accessibility. Captions are generated on upload in the spoken language, or you upload your own WebVTT, which is the part of WCAG most course video misses.
Protection when you need it. Private signed playback by default, or DRM with Widevine and FairPlay for content that has to be locked down.
How a creator turned a YouTube channel into courses
On the day we launched the plugin, one of the first people to use it was a creator with a full YouTube channel who wanted to turn his videos into real courses. He did not want to download every video and re-upload it, and he did not have to. In the FastPix Video activity he pasted each video's YouTube URL into the video-source field, FastPix pulled the video in, and it moved onto streaming infrastructure he controlled, captioned and trackable, without a file ever leaving his machine.
He rebuilt his playlists as Moodle courses, one video to an activity, in an afternoon. What would have been a re-upload marathon was a run of pasted URLs. Now the same videos that used to sit on a public channel with no completion data stream adaptively inside his courses, carry captions, and tell him who actually watched, and his originals stayed on YouTube too. Adding a video became copy, paste, save.
The only thing he needed to begin was a free FastPix account, with the first $25 of delivery and storage covered by signup credits. That, the plugin from the Moodle directory, and the URLs he already had.
FAQ
Why is my video not uploading to Moodle?
Almost always a size limit. Moodle caps upload size at the server and site level, and large lecture recordings hit that wall. The cleaner fix is to upload through a plugin that sends the file directly to a video platform in resumable chunks, which bypasses Moodle's storage and survives a dropped connection.
How do I embed a video in Moodle?
For an external video, paste the URL into a rich-text field and Moodle's media filter renders a player. For a video hosted on FastPix, use the editor's Insert FastPix Video button or paste the FastPix short code, and the filter renders the player on the page.
How do I add a YouTube video to Moodle?
Paste the YouTube URL into a rich-text field, or use the media icon in the editor. It is the fastest option, but it puts content on a public platform and gives no completion tracking. For coursework that needs privacy or a grade, host the video instead.
How do I upload a large video to Moodle?
Don't route it through Moodle's own storage. Use a video plugin that uploads in resumable chunks directly to a video platform, so file size is limited by the platform, not by Moodle's upload cap or your server's memory.
How do I know if a student watched the video?
Built-in uploads and YouTube embeds can't tell you. The FastPix Video activity records the unique seconds watched and marks completion only when the student crosses the threshold you set, then writes the grade to the gradebook.